Provisioning your Raspberry Pi-4 Cluster with Ansible
Problem
I have eight Raspberry Pi 4 8GB at work and wanted to setup them up to be a High Availablity (HA) Kubernetes Cluster for some projects that comprise of Edge, Fog Computing. The Problem is redundancy of setting these Pis up with pretty much the same thing. Think of installing something but doing it 8 times in total! Sounds more of an hassle!
Solution
Using ansible we can setup a number of Pis in the cluster without having to repeat anything!
Network
This is what my network look like:
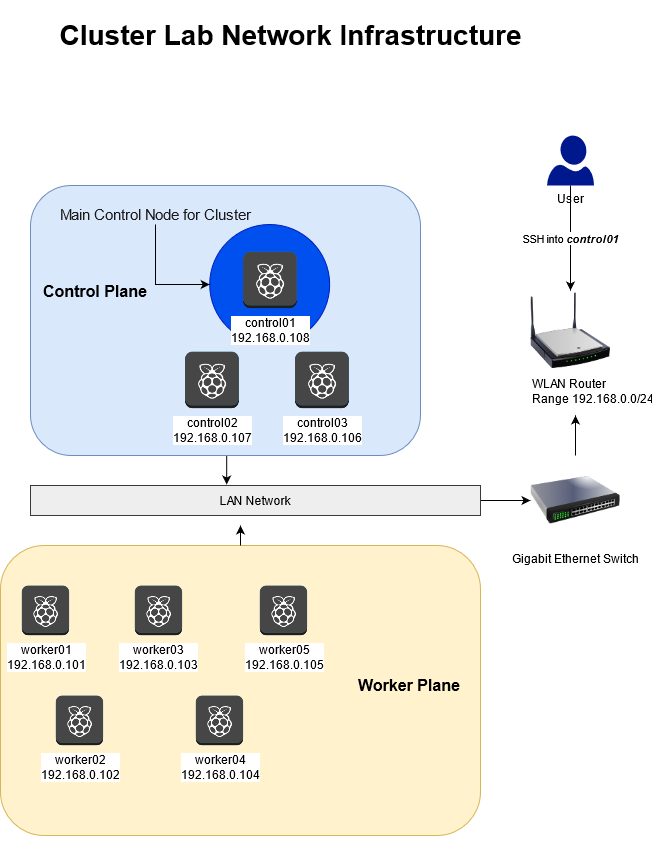
Cluster Network Diagram
Component Description
| Component | Quantity | Description |
|---|---|---|
| WLAN Router | 1 | DHCP Server / Entry for user |
| Gigabit Switch | 1 | High-Speed Networking |
| Raspberry Pi-4 8GB RAM | 8 | Control / Worker Nodes |
| 64 GB SD Cards | 8+ | For Operating System / Storage |
| Cat6e Ethernet cables | 8+ | For connecting to Switch |
| Operating System | - | Ubuntu 20.04 - LTS on Pis |
SD Cards are not the best choice, since they wear-out over longer usage.
A possible solution is to by USB3.1 based storage disks which can be used to store information and boot the Raspberry Pi Up.
For the time-being, the SD Cards will do just fine
Fixed IP Address Allocation
Either use DHCP Address Allocation on your WLAN Router to dedicate a fixed IP address to the MAC Address of your Raspberry Pi 4s or configure your Operating System for your Pis with static IP Addresses. I chose the former method, since mapping the MAC Addresses with defined IP addresses using your WLAN router’s UI is way easier. Also I wasn’t aware what the MAC Address of each of the Pi was beforehand, so the UI was able to show it to me easily.
Node Roles
Control Nodes
As described in the figure, I will pick 3 Pis as Control nodes. They will be able to control the worker nodes and also be a bit more fault-tolerant as compared to having just one node control the whole cluster.
Out of these 3 nodes, I will pick on to be the entry-point and main node that I will use to work with and provision my cluster (control01 Pi with 192.168.0.108)
Worker Nodes
The are the real MVPs here. These nodes will do all the heavy lifting for us.
Initial Setup
Download the Ubuntu Server 20.04 LTS 64-bit OS Image
Follow the instructions of burning the image on to the SD Cards
Setup your Pis by inserting the SD Cards, connecting the Pis to the Switch and powering them up (Note: make sure to provide a minimum of 3A current to the Pis or else you might face brown-outs)
Connect the WLAN Router to the Switch and use the router’s UI to provide fixed/static IPs to each of the Pis
Connect to the WLAN network and, login into the Pi with address
192.168.0.108usingsshssh -l ubuntu 192.168.0.108
Note: all the Pis will have the username ubuntu
Hard Part
Be a nice developer / administrator for once and log into each Pi and change the passwords to something safe. Just this one time.
As it is, Ubuntu will insist you on changing the password for the ubuntu user on the very first SSH Login. Might as well begin with good security practices!
For the sake of simplicity, you can keep the same password for each Pi (but preferably you would use some form of password generator for distinct passwords for each Pi)
I promise, this is the only time you will have to login these Pis individually!
You can change the passwords for the user ubuntu and root using:
echo "changing root password"
sudo passwd

echo "changing user Ubuntu's password"
passwd
Setting Up the Cluster
on the Pi with 192.168.0.108 you are currently logged into change the /etc/hosts file:
sudo nano /etc/hosts
We map the names of the Pis to their respective IP addresses and use the .local mdns FQDN for ease of access
127.0.0.1 localhost # This is me, hello!


## This can be adapted according to Your Needs!!
## Cluster Lab Hosts
### Control Nodes
192.168.0.108 control01 control01.local
192.168.0.107 control02 control02.local
192.168.0.106 control03 control03.local

### Worker Nodes
192.168.0.101 worker01 worker01.local
192.168.0.102 worker02 worker02.local
192.168.0.103 worker03 worker03.local
192.168.0.104 worker04 worker04.local
192.168.0.105 worker05 worker05.local
Checking Connectivity
we can use nmap on the pi to ping the sub-network and see if all the Pis are reachable
$ sudo apt install nmap

$ nmap -sP 192.168.0.100-120 # the IP range for the network
This should yield:
Starting Nmap 7.80 ( https://nmap.org ) at 2021-05-05 14:44 UTC
Nmap scan report for worker01 (192.168.0.101)
Host is up (0.00073s latency).
Nmap scan report for worker02 (192.168.0.102)
Host is up (0.00060s latency).
Nmap scan report for worker03 (192.168.0.103)
Host is up (0.00051s latency).
Nmap scan report for worker04 (192.168.0.104)
Host is up (0.00046s latency).
Nmap scan report for worker05 (192.168.0.105)
Host is up (0.00041s latency).
Nmap scan report for control03 (192.168.0.106)
Host is up (0.00034s latency).
Nmap scan report for control02 (192.168.0.107)
Host is up (0.00029s latency).
Nmap scan report for control01 (192.168.0.108)
Host is up (0.00024s latency).
Nmap done: 21 IP addresses (8 hosts up) scanned in 1.41 seconds
Looks good and well-connected!
Introduce Ansible to your Pi Fleet
First and foremost install ansible on the Pi with Address 192.168.0.108
sudo apt install -y ansible
Change the Hosts file for ansible as follows:
sudo nano /etc/ansible/hosts
(Open the link below so see the configuration)
# Cluster Lab Settings

[control]
## all the "control" nodes go here
# keep control01 as local but other nodes can be reached via ssh
control01  ansible_connection=local  var_hostname=control01
control02  ansible_connection=ssh    var_hostname=control02
control03  ansible_connection=ssh    var_hostname=control03

[workers]
## all the "worker" nodes go here
worker01  ansible_connection=ssh  var_hostname=worker01
worker02  ansible_connection=ssh  var_hostname=worker02
worker03  ansible_connection=ssh  var_hostname=worker03
worker04  ansible_connection=ssh  var_hostname=worker04
worker05  ansible_connection=ssh  var_hostname=worker05

## The complete group of pis here is called a "cluster"
## which comprises of "control" and "workers"
## You can however name the group however you like!
[cluster:children]
control
workers
Remember that at this point of time we haven’t even changed the names of the hosts on each Pis,
we have just mapped the IP Addresses to a name! But we will automate such changes via ansible
Passwordless logins via SSH
In the configuration for the ansible hosts, you could see ansible_connection=ssh in all but one nodes. This is achieved by generating an SSH key from the present Pi and shared to all other pis
$ # On cluster01
$ mkdir -p ~/.ssh && chmod 700 ~/.ssh
$ ssh-keygen -t rsa
$
$ # Copy the Key to each node in the cluster
$ ssh-copy-id -i ~/.ssh/id_rsa.pub ubuntu@control02 # control03, worker01-worker05 ...
Connectivity via ansible
Let me show you why I am blow away by ansible
Ping all the nodes using:
$ # cluster is the name of the group mentioned in the `/etc/ansible/hosts` file
$ ansible cluster -m ping # here -m is module which is <ping>
And surely you get pings from all the nodes thanks to ansible
You can ping just the control nodes using
$ ansible control -m ping
$ ansible workers -m ping # say hello to the Workers
Change the hostname for each Pi via ansible
Now, remember each Pi on the network is still called ubuntu@ubuntu where ubuntu is also the hostname. To do it manually would comprise of executing the following command in each Pi
hostnamectl set-hostname <desired_hostname_for_pi>
in the /etc/ansible/hosts file we declared var_hostname=... which will set the names up in a single command line instruction
$ ansible cluster --become -m shell -a "hostnamectl set-hostname {{ var_hostname }}"
And Voila! this will be done for all Pis. To check the name changes execute:
$ ansible cluster --become -m shell -a "hostnamectl status | get hostname"
and all the Pis should have the designated hostnames
Changing Configuration for Containers
you need cgroup enabled in the Pi to do fun stuff with containers (docker, kaniko etc.) in the
/boot/firmware/cmdline.txt file.
Do this via ansible:
$ ansible cluster --become -m shell -a \
"sed -i '$ s/$/ cgroup_enable=cpuset cgroup_enable=memory cgroup_memory=1 swapaccount=1/' /boot/firmware/cmdline.txt"
Install microk8s on the cluster
You can install microk8s on each pi using Snap from Canonical using:
$ ansible cluster --become -m snap -a "name=microk8s classic=true channel=1.21"
The command will install microk8s v1.21/stable on each Pi
To check the status using ansible:
$ ansible cluster --become -m shell -a "snap list | grep microk8s"
Final Reboot
Since you have made changes if might be better to reboot the Pis you can do this based on the subgroups
$ ansible control02 --become -m reboot
$ ansible control03 --become -m reboot
$ ansible workers --become -m reboot
Finally reboot the current Pi cluster01
sudo reboot
Concluding Remarks
I am honestly blown away by ansible as tool and planning to learn it and other aspects like the Playbooks where you can configure the fleet using files!!